One Cuckoo Short of a Nest Quick Links

News PoliticsReviews IT On A Friday Cabinet Unpacked
Showing posts with label How To. Show all posts

Friday, August 20, 2010

A quick guide to voting for first-time voters

Digg this

In case you have managed to miss… or throw out… all of your AEC documents explaining how the Australian Federal voting system works, here is your replacement guide on how to go about voting tomorrow.

Firstly, you need to find a polling station in your electorate. You can do this by going to www.aec.gov.au and using the online polling booth search.

This next bit is a no-brainer: once you have found where your local polling station is you must go there. When you get there you will join a line (if there is one) at the registration desk. There the AEC (Australian Electoral Commission) workers will cross off your name and give you two pieces of paper – a small green sheet for the House of Representatives, and a large white sheet for the Senate.

You will be directed to a cardboard booth where you are to fill out your ballot papers.

Voting for the House of Representatives is really simple – simply number every box in your order of preference. You do not have to follow any of the parties’ “how to vote” cards, as where your preferences go is entirely up to you.

The Senate voting sheet may look daunting, however it is just as simple as the House of Representatives. On the Senate sheet you have the option of voting above or below the line. You can simply put a “1” in the box next to the party you wish to support as first preference above the line, with your preferences being distributed according to that party’s set preferences, or you can number every box below the line in your order of preference and choose where your preferences go. This only takes a couple of minutes.

If you make a mistake you are allowed to ask for another ballot sheet.

Fold your ballot papers and place them in the appropriate boxes on your way out. You are now free!

IMPORTANT NOTE: You are not allowed to wear any clothing, badges etc. with a political party mentioned on it within six metres of a polling station. So unless you’re taking something to cover it up, don’t bother ironing your Australian Sex Party shirt tonight!

Tuesday, February 9, 2010

On A Friday: How To Escape A Ninja

Digg this

There has been a craze of “Ninjas can’t catch you if….” backgrounds sweeping the internet. One of my personal favourites is one designed for a dual monitor desktop that reads “Ninjas can’t catch you if you’re on another monitor.”

Two Monitor Pic
“Ninjas can’t catch you if… you’re on another monitor”

But despite this being a reasonable argument I am not convinced. Why? I am certainly no expert at dodging jumping, near-invisible, super-stealthy killers so I don’t take much comfort from there just being a monitor between me and them!

So to arm myself against these killers in black I have created my own safeguard. I feel it may just save my life:

other computer www.onecuckoosnest.com
“Ninjas can’t catch you if… you’re on another computer”
[CLICK IMAGE for larger version]

And with that advice I wish you a happy, ninja-free week.

P.S. – I know it’s not Friday but this is such an important community service announcement that one can throw convention to the wind!

image

Sunday, January 17, 2010

How To: Bring Admin Tools to Your Fingertips

Digg this

admin toolsApplies to:
Microsoft Windows 7 (32- and 64-bit editions).
Microsoft Windows Vista (Recommended usage for 32-bit editions only).
---
This is a little trick which is a really handy way to quickly access administrative tools. It is really simple to implement, however it is mentioned on the internet that this can crash 64-bit editions of Windows Vista. The example screenshots in this tutorial were taken in 64-bit Windows 7, which proves that it can be stable in 64-bit 7.

The process to create a link to this utility is really very simple. Firstly, create a new folder anywhere on your computer or on removable media. The trick to making this folder special is the name – name the folder anything you like (without using punctuation is the best way to ensure that this will work) and add the following to the end of the name:

.{ED7BA470-8E54-465E-825C-99712043E01C}

Deselect the folder to change the name and the folder’s icon should change to the control panel icon (image: top right). The name you gave the folder should be the only visible part of the name.

Opening the folder will present a screen sorted into categories corresponding to different areas of Windows.

This trick may also work for users without administrative access, however these users may be prompted to enter administrator credentials when changing settings.

image

OCSN

Sunday, January 3, 2010

How To: Display the Old Right-Click Menu in the Windows 7 Taskbar

Digg this
IMAGE: Taskbar default right click menu

Microsoft made many changes to how users interact with programs in Windows 7, one of these changes involved the replacement of the menu that appears when you right-click on a program’s icon in the taskbar.

The new menu provides many enhanced and useful commands for programs designed to use it, including fast links to certain features in that program and recently opened documents. These features are all very useful, however the original functionality of this menu has been removed as a result.

image: closed program shift right-clickThat is not to say that the old menu is not gone forever, it does however require an additional command to make it appear. Holding down the ‘Shift’ key whilst right-clicking will bring back the old menu. With the shift key held down, right-clicking a closed program’s icon will bring forward the standard shortcut menu (with a very slightly different layout), and right-clicking an open program will, in most cases, open the old right-click menu from Windows 95 – Vista. It’s as simple as that! Some programs do show modernised menus for open programs, such as Microsoft’s Paint and Messenger.

Windows 7 is far more functional and much easier to use than any previous version of Windows. It is especially good for touch screen computers with the new interface designed with this application in mind. Although the new layout of the operating system, such as the taskbar right-click menu, may appear to be reduced in functionality, simple command adjustments within 7 make the new Windows far more productive and accessible than before.image: open program shift right-click

ocsn

Friday, November 20, 2009

How To: Easily Create a Font for Free

Digg this

Fonts. You’re looking at one now. Look around your screen and chances are you will find at least one more, but have you ever wanted something different? Something unique to you? Well, what could be more unique than your very own, home made font!

To make a good font easily, you need two free programs:

  • Inkscape
    This is a cross-platform vector image editor (that is, images that can be resized without pixilation) that can export in the SVG format. Other similar programs may also work.
  • FontForge
    This is a cross-platform font creator. It is native to Linux, however there are ports (versions) which work well on Windows.

Once you have downloaded and installed these two applications, you can begin.

  1. Firstly, you need to get creative in Inkscape and create your font. Shapes can be created with the pen tool and the circle, square and polygon tools. Other tools may not export to FontForge well if at all. If you want your glyph (your individual font image) to have a Exclusion in Inkscapetransparent section within an opaque area, create the inner shape over the outer shape, select both and navigate to “Path>Exclusion”. This will make the middle transparent. 
  2. Save each glyph as a separate SVG file under an appropriate name.
  3. Font Forge 1Open font forge and at the “Open Font” menu,  select “New”. You will be presented with a table of empty glyph positions.
  4. Double-click on the glyph you wish to insert your image into.
  5. A rather daunting screen will appear (if the grid one wasn’t already scary enough!), but it is easier to use than it looks. Import in FontForgeIf you want to create your glyph from scratch with the FontForge toolbox (this is NOT what is being explored in this tutorial) you can do so now. However, as we have already created the glyph in Inkscape, simply select “File>Import”, choose “SVG” from the “Format” drop-down and navigate to and select the file made in Inkscape.
  6. Now we need to resize the imported image. Click and drag a box around the Just Importedglyph with the “Pointer” tool. Now either move the body of the image to the first bottom line in the guideline from the centre, or click “Scale the Selection” from the Toolbox (7th button down on the left) and resize it to the size you want it to be. Holding down the Shift key on the keyboard will help to keep the image in shape. At the end, the body of the glyph should line up with the first line, with any tail overlapping toward the second line. This second line should not be passed.
  7. Now you can adjust any point (or points) in the glyph that you are not happy with. Using the “Pointer” tool, select the nodes in the glyph and move or adjust them as you feel fit.
  8. Now the glyph needs to be finished by adjusting theR+L Margins margin between the edge of the glyph and the right and left sides of the bounding box. Usually an equal distance on each side works well. Simply select the whole glyph (as we did before) and nudge it left or right using the corresponding keys on the keyboard until the left margin is as large as you want it to be. Deselect the glyph and then drag the bounding box line on the right to be roughly the same as that on the left.
  9. Repeat for each glyph. Not all glyphs need to be filled, however it is recommended that most letters and numbers are created.
  10. When you have completed your font, on the grid screen select "Element>Font Info”. Here you set your font’s name. It’s acceptable to enter the same name in each of these, just make sure it is one that is unique to the font to avoid conflicts.Font Information
  11. Export the font! To do this, select “File>Generate Generate FontsFonts”. Select “True Type” from the first drop down menu and, if you choose to, select “upload it to the Open Font Library”. If you decide to upload your font to this resource, make sure you read the licensing requirements of this service as it makes your font open source. Click “Save” and accept the error dialogues and your font should work fine.
  12. There isn’t one! You have finally finished! A long process but well worth it.

Also see: How To: Install Fonts in Windows and Ubuntu

OCSN

Saturday, October 3, 2009

How To: Install Fonts in Windows and Ubuntu

Digg this
Fonts are surprisingly hard to install for something that we use daily, and chances are if you have bought a CD of fonts they were installed for you using a setup program. But what if you have a single font file that you have downloaded or made and want to install on your computer?
In Windows operating systems, a shortcut to install a font (without going to the fonts folder) was not included until XP, and in my experience this is not present for some users in Vista. Windows 7 makes it easier, however in both Vista and 7 users must be able to supply administrator credentials at the User Account Control (UAC) prompt. Windows 7 also improves the Fonts folder - the first major update since Windows 3.1.
Ubuntu is baffling for anyone trying to install a font, unless they have been told how to do this before hand. The process is simple once explained, however font installation in Ubuntu is still in need of some work.
FOR WINDOWS USERS:
fonts folder
In any version of Windows from 3.1 to Vista, a font can be installed from the ‘Fonts’ folder. To get to this, open the ‘Control Panel’ and then open the ‘Fonts’ applet; this will take you to the Fonts folder. Click ‘File>Install New Font…’ in the Install FontMenu Bar. If the menu bar is not present (i.e. there is no ‘File’ menu), right-click on a blank  area in the folder and then select ‘Install New Font…’.
In Windows 7, a new font is installed by opening the font file and selecting ‘Install’ or right-clicking on the font and selecting ‘Install’ and then accepting the UAC prompt if it smegmented installappears.
The right-click method may also work in XP and Vista depending on user privileges.

A CLOSER LOOK: INSTALLING FONTS IN WINDOWS XP AND VISTA:
The ‘Add Fonts’ menu (accessed by clicking ‘File>Install Newadd fonts Font…’ in the ‘Fonts’ folder) has remained the same since Windows 3.1, and can be a little confusing to navigate for less tech-enthusiastic people.
To find a font that is in your  ‘My Documents’, or ‘Desktop’ folder, or in a subfolder of one of these folders, you need to navigate to your user files. All user files are usually located in the C:\ drive. Select ‘C:\’ from the top of the ‘Folders’ area, and for Windows XP users, open ‘Documents and Settings’ and for Vista users open ‘Users’. From here, open the folder with your username and then choose the appropriate file.

FOR UBUNTU USERS:
Ubuntu requires a slightly different process to install a font. There is no graphical installation for fonts, but fonts are installed by simply copying and pasting them into the ‘.fonts’ folder in show hidden filesyour home folder. This, however, only installs the font for the user installing the font.
The ‘.fonts’ folder usually doesn’t exist by default, and if it does exist it is hidden. To view hidden files, navigate to your home folder and select ‘View>Show Hidden Files’, or hold down the control key and press ‘H’.
Now the procedure is simply a matter of checking if the ‘.fonts’ folder is present and, if it isn’t, making the folder. This copiedfolder will become hidden once you close the file browser, so to access it again click ‘Show Hidden Files’.
Now open the folder with the font/s that you want to install, copy them and then paste them into the ‘.fonts’ folder. The font/s will become available to applications when they are next started.

Once these processes are learned for each operating system (OS), it is easy to install a new font on that OS – just make sure that you back up any purchased fonts!
image

Friday, September 18, 2009

How To: Create a ‘favicon’ (Another Iconic Post)

Digg this
favicon in IE8 Beta screenshot

If you are using Internet Explorer 7 or above right now, you should be able to see a green icon that reads ‘o c s n’ in the tab for this page and in the address bar of that tab. This little icon is called a ‘favicon’, and it is easy to add to most websites!

Before you begin, you need to make sure you are able to add a favicon to your website. To do this, you need:

  1. A website or blog that allows you to edit the web page or template’s HTML.
  2. A web hosting or blog hosting service that allows *.ico files (where the asterisk represents a file name) to be uploaded. (This address can be different to the address you plan to apply the favicon to.)
  3. An icon (see below).

First you need an icon in the *.ico format. Instructions on how to do this can be found in the How To: Make Your Drive Stand Out post. This icon should be a single, 16x16 image. No alpha channel works best.

Now you need to upload your icon to the internet. It does not matter if it is uploaded to an entirely different website/hosting service to the website that you plan to apply the icon to; you just need to know the web address of the icon.

The method of adding the favicon to the website you want to apply it to is rather simple. All that is involved is adding a line of HTML to the website’s template or the web page you plan to add the icon to. Add the following code after the ‘<head>’ tag in your HTML:

<link href='(full address of icon)’ rel='icon' type='image/x-icon'/>

UPDATED (24/11/2009): THIS WORKS BETTER: <link href='(full address of icon)' rel='icon' type='image/vnd.microsoft.icon'/>

Whilst you are adding lines of code to this section, you may want to add this after the above line of code:

<link href='(full address of icon)’ rel='shortcut icon' type='image/x-icon'/>

UPDATED (24/11/2009): THIS WORKS BETTER: <link href='(full address of icon)' rel='shortcut icon' type='image/vnd.microsoft.icon'/>

This second line will ensure any bookmarks to the site also show the icon.

Now save the website and it should work! NOTE: The favicon may not appear in the the address bar or the tab when the page is not loaded in Internet Explorer. In the case of Blogger, the favicon will, however, appear in links to your site in people’s profiles and the followers area no matter which browser is used.(Note: Last bit not true if updated (24/11/09) code is used, however it may take some time to show the new icon if you have loaded the page before.)

Friday, June 12, 2009

Friday Fun: Make Your Very Own Pointless Program

Digg this
Feel like whiling away ten minutes? What better way to do it than by making a program that will make your friends think you are uber-cool!

If there is any one point to this, it is a very basic tutorial of MS Visual BASIC 05/08.

The process and code are very simple and Visual BASIC 2005 or 2008 can be used. Download the example to see how it should work if you run into any difficulties.


1. Add two scroll bars (I used one vertical and one horizontal), four progress bars and two picture boxes (dimensions set to a size of 1,1) to a blank form. Assign an image to each picture box.

2. Add the following code to the scroll event of one of the scroll bars:

ProgressBar1.Value = VScrollBar1.Value

ProgressBar2.Value = VScrollBar1.Value

ProgressBar3.Value = VScrollBar1.Value

ProgressBar4.Value = VScrollBar1.Value

HScrollBar1.Value = VScrollBar1.Value

PictureBox1.Height = (VScrollBar1.Value * 1.3)

PictureBox2.Width = (HScrollBar1.Value * 1.3)


And this to the scroll event of the other scroll bar:

ProgressBar1.Value = VScrollBar1.Value

ProgressBar2.Value = VScrollBar1.Value

ProgressBar3.Value = VScrollBar1.Value

ProgressBar4.Value = VScrollBar1.Value

VScrollBar1.Value = HScrollBar1.Value

PictureBox1.Width = (HScrollBar1.Value * 1.3)

PictureBox2.Height = (VScrollBar1.Value * 1.3)

3. And that’s it! Have a little play and see what happens to the picture boxes when you drag each scrollbar. Add bits, play around with it. There are a large number of toolbox items that use the ‘value’ field that can be easily added to this. Go wild – there are no boundaries to a program without any purpose!

Download the One Cuckoo short of a Nest example. (http://www.freewebs.com/gpile/PointlessProgram.exe)

Wednesday, June 10, 2009

How To: Make Your Drive Stand Out

Digg this

Ever had to look twice to find the drive you are looking for in the ‘My Computer’ screen? With an icon file (*.ico) and some simple code this is made easy!

My ComputerWhere’s my Drive!? Sometimes it can be hard to find your drive in the “My Computer” window.

First you have to choose an icon; you can use one you have already, make your own or extract one from the Windows shell32.dll (c:/WINDOWS/System 32/shell32.dll) or other program. A great free program to create or extract icons for both Windows and Mac is IcoFX, available from http://www.icofx.ro. To create a new icon in IcoFX, click File>New, select your icon size (there is an automated process in IcoFX that can convert an icon into all sizes and colour depths that can be applied afterwards, but it is best to choose 48x48 or larger for resolution purposes) and start drawing!

IcoFX

Save your icon as a “Windows Icon ('*.ico)” and open Notepad or other such text editor.

Type the following code (where “icon.ico” is the full name of your icon):

[autorun]

icon=icon.ico

Save this file as “autorun.inf” to the root directory (eg: f:\) of the drive you wish to apply the icon to (It is a good idea to make this file hidden), and do the same for the icon itself. The icon may not show up until an eject or restart.

This can be applied to any Windows flash drive, CD ROM/DVD/HDDVD/BD (include all files on the disk), hard disk drive or SSD. It will not work on a network drive or floppy disk.

If you wish to place your icon in a folder other than the root directory of your drive, type the following (where “documents\icon.ico” is the path from the root folder of your icon):

[autorun]
icon=documents\icon.ico

Friday, March 27, 2009

How To: Improve Backwards Compatibility in Windows Vista and Windows 7

Digg this
Microsoft changed the indexing structure in Windows when they made Vista which causes some programs not to work in the new OS, however Vista and 7 have a hidden feature that allows old programs that ran on the old indexing system to work again. Strangely, Microsoft hasn’t enabled this by default but it is an easy “feature” to regain. (Windows 7 Beta 1 is depicted, however the same principals apply to Vista.)

1. Open the Control Panel and (in classic view) select “Programs and Features” from the menu.

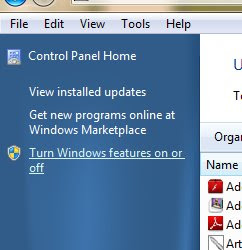
2. In the left panel, select “Turn Windows features on or off.”

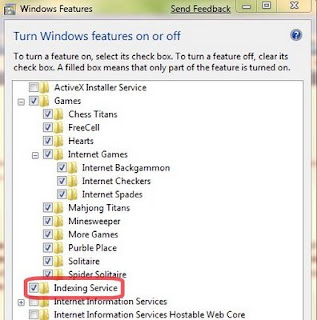
3. Wait for the list to populate and make sure that the “Indexing Service” feature is checked.

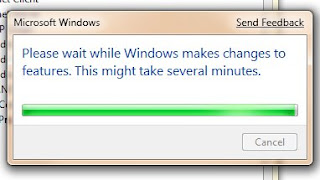
4. Select “Ok” and wait for the feature to be installed.

IN WINDOWS 7:
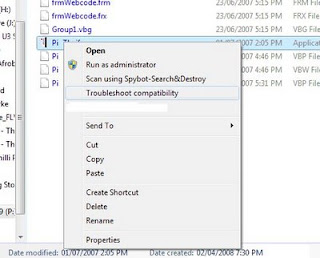
Windows 7 has a new feature to help enable compatibility mode for old programs; right click on an application and there is an entry “Troubleshoot compatibility.” Selecting this will open a wizard that asks a series of questions about what happens when you attempt to launch the program and Windows figures out which settings to apply to the program.

Most Popular This Week on OCSN

Save the net from censorship!


Counter